
DJI Mavic Pro Vs Mavic Air – Which One You Should Buy?
INTRODUCTION
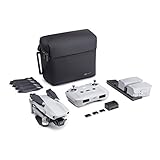
Mavic Pro

The DJI Mavic Pro is a compact, folding drone that folds down to fit easily in a backpack or even a large pocket. You can simply open it, take beautiful pictures and then fold it and put it back in your pocket. It has long-range and HD live video streaming enabled.
Mavic Air

The Mavic Air offers all the fun features that you can possibly think of. It is needless to say that Mavic Air instantly took the trophy for the best video at the lowest price of any drone in the market.
MAVIC PRO VS MAVIC AIR - SPECIFICATIONS
Memory
Both the Mavic Air as well as the Mavic Pro have built-in micro SD card slots that can handle up to 128 GB. Roughly translated, you can fit in a lot of videos in this little machine! Also, they both have their own 8 GB inbuilt memory as well!

- 【UP YOUR GAME】: The Mavic Air 2 camera drone takes power and portability to...
- 【NEXT-LEVEL CONTENT】: Capture impressive 48MP photos with a 1/2-inch CMOS...
- 【IMPROVED FLIGHT】: An impressive flight time of up to 34 minutes allows you...
Size
The size difference between the Mavic Air and the Mavic Pro is quite noticeable. The Mavic Air is roughly half the physical size of the Pro, and it’s much lighter (430 g). The Mavic Air can fit into pockets, bags, and backpacks with ease and thus is super travel-friendly. So you can get some spontaneous footage because you are literally carrying a drone in your coat pocket!
Speed
The Mavic Pro will go over 45mph, and the Mavic Air can go around 40mph. During obstacle avoidance, the Mavic Air will only go 20mph while Pro can go at almost 30mph.
The Mavic Air has a gimbal design that has a very limited range of motion. The Mavic Pro can go up to 45mph without the gimbal reaching its limit. This is a really big deal for all those whole like to get shots of moving vehicles.
flight time
Flight time fluctuates due to environmental factors, but as a rough estimate, the Mavic Pro can provide us with 23 minutes and the Mavic Air with 18 minutes indoors.
Slow Motion
Both drones can shoot slow-mo at 1080p video at 120fps. This is a great added feature, though it should be noted that slow-motion videos don’t have such good quality that these drones can otherwise provide you. But, as an extra feature, this is not a bad one.
HDR Photos
High dynamic range photos look amazing in the Mavic Pro and Mavic Air as well. The D-HDR mode in these drones should give you much more detail in the highlights and shadows of your captures.
Better HDR photos can also be taken from the Mavic Air and even the Mavic Pro with their AEB (auto exposure bracketing) mode, which basically does the same job as HDR mode, though it requires a lot more work and overall extra editing too.
360 Pano Mode
- 【UP YOUR GAME】: The Mavic Air 2 camera drone takes power and portability to...
- 【NEXT-LEVEL CONTENT】: Capture impressive 48MP photos with a 1/2-inch CMOS...
- 【IMPROVED FLIGHT】: An impressive flight time of up to 34 minutes allows you...
The Mavic Pro has all of the panoramic modes similar to the ones in Mavic Air. However, there is one major difference that is quite noticeable. Both drones can shoot 360° panoramic images, but the Mavic Pro has a much better image sensor when you want to capture higher-resolution panoramas.
If you want to go for the easier way to do panoramas, go for the Mavic Pro for the long haul. You just need to let the drone do all of the processing, which will save you tons of time and will also end up with some pretty amazing results. Another way to get good panoramic photos is to take the photos and save them as RAW files for processing later in a photo editor.
What is monopod?
A monopod can be defined as the accessory designed to support the camera. A monopod has a single leg hence called a monopod. Its height is adjustable. It has a quick release plate to place and remove your camera easily.
WHEN TO USE MONOPODS?

When you don’t need rock-solid support for your smartphone or camera, you can opt for a monopod. It gives you more handheld flexibility. This single-legged camera support accessory is available in different shapes, sizes and weights. Sometimes you have a crazy shooting schedule that requires continuous movements from one place to another.
At such times monopods come to your rescue. You might have observed many sports photographers using monopods. They are easy to carry, move and hold. They are small and compact. They don’t take much floor space. You don’t even need a carry bag if you are using a relatively small monopod.
You get more mobility and quick operation. You don’t have to fold three legs every time. Some monopods even have a multi-stage leg. Just unfold the leg, adjust the height and start shooting. This light piece of accessory can accommodate the weight of heavy lenses. So if you are into adventurous, nature, sports or landscape photography, then monopod is the best affordable portable option for you.
What is a tripod?
Just like a monopod, a tripod is also designed to support your smartphone and camera. It has three legs hence called a tripod. You get more stable support and some greatly advanced functions in a tripod.
When to use tripods?

A tripod offers you a strong, solid platform to place your camera. Its legs are more stable and steady compared to a monopod. You get a variety of sizes and different mounting styles in tripods.
You don’t need to worry about shaking off a camera as it offers amazing stability. You can use slow shutter speeds and take long exposure pictures comfortably. It can hold the camera at one spot and hence is most suitable for macro, time-lapse and studio photography where it is required for the camera to be held in a fixed position.
You need to set the camera once on a tripod, and you are free to control it remotely using a shutter. While in the case of monopods, you have to constantly get worried about dropping down the gadget and ruining your shot.
You get beautifully blurry backgrounds and sharp, clear images using a tripod. It is also a great option for wildlife photography as you can set a camera on a tripod, place it at the desired location and then disappear to take shots of wild animals. It is best suited to capture beautiful HDR and panorama shots.
MAVIC PRO VS MAVIC AIR - WHICH DRONE SHOULD YOU BUY?
Well, this depends on several factors. Even though Mavic Air and Mavic Pro look similar in designs, many other things need to be considered.
The Mavic Air does have a mode for higher resolution photos. However, that could lead to muddy colors and less sharp images. Raw shooting is definitely better, but you will have to use Photoshop to manipulate the results during post-processing to achieve the colors you want. It does produce great stills and videos in a smaller and lighter version of Mavic Pro 2.
The Mavic Pro is everything you would want in a drone. It has a large 1-inch sensor with a 10-bit color profile that makes color grading super easy and clean. Its zoom functionality is great for isolating the foreground from the background. Action shots are better and more useful now, thanks to their increase in speed. It has a longer flight time which means that you can fly farther than ever before with plenty of time to shut it off and go home.
The Mavic Pro is stuffed with such features that it automatically justifies the extra cost, and it will surely blow you away by the video quality. When you get the files off of the SD card and onto your computer, you will be shocked at the amazing shots and quality this drone got you. It is advised to get DJI Care so that you have peace of mind.
CONCLUSION
Now coming to a point on which is best, it is very tough choice as both have moreover equal features considering the price tag and it is also kind of subjective. So I leave the decision to you. Which one did you choose? Comment it below.