
33 Best Camera Accessories
As jewelry adds complement to your attire, there are some camera accessories that you can use with your cameras and lenses, and take your photography career to a whole new level.
With that said, I'm not saying all the camera accessories mentioned in this article are a must for your photography profession. If you are a beginner, a basic camera with a kit lens is more than enough.
But for professionals looking for "something extra" to elevate their camera techniques, these camera accessories can be beneficial.
I'm Xavier, a cinematographer for 10 years. In this article, I will be listing some camera accessories that you can add to your camera kit.

You will also find an answer to the most commonly asked question by photographers, "How to take care of camera gears in a cost-effective way"? If you too have this doubt, don't worry; I have solutions for that as well. Read the article carefully to know the answer!
CAMERA STABILIZATION ACCESSORIES
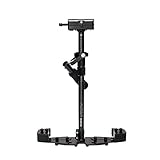
STEADICAM/STABILIZER
Do you think “Fast and Furious” or the “Dark Knight” was shot without any stabilization system? If the cinematography team didn’t use a professional steadicam, we probably would have seen unsmooth footage of the action shots.
So what is a Steadicam? A Steadicam is a wearable camera stabilizer that will help you get smooth fast-tracking shots. Even the movement of the camera operator will be completely neglected by a Steadicam, so what you see is only 100% smooth videos without any bumps, shakes, or jolting.
Even if you are filming in bumpy terrains, like mountains or forests, you can take that pro-level video content with a proper camera stabilization system in your hand.
If you are looking for a good-quality steadicam for a DSLR camera, then you have a lot to choose from. I would suggest purchasing one from FLYCAM as they manufacture top-quality Steadicams.
If you are a beginner wanting to know how a Steadicam works, you can go for budget friendly DSLR stabilizers available in the market. They come around a price range of 15$-100$.
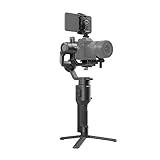
GIMBAL
Gimbal is the most common stabilization system everyone knows, but the confusion most of us have is “is a steadicam and a gimbal the same”?
Had you got this doubt earlier? Well, then let me tell you the answer briefly. Yes, a gimbal is also a handheld stabilization system to capture smooth videos like a Steadicam.
But unlike a Steadicam which is wearable, a gimbal is a handheld machine made of motors and other moving parts. In simple words, a gimbal is motorized and requires battery power to operate.
With a gimbal, you are guaranteed to achieve blur-free pictures and videos no matter you turn or take shots from tricky angles. Most gimbals come with a 3-axis image stabilization feature.
Steadicams are usually costlier than gimbals and provide better mechanical stabilization.
You can use gimbals with any kind of digital camera. Below, I have recommended some gimbals for GoPro cameras because vloggers usually prefer using a gimbal.
It is not that gimbals work only with compact cameras; even DSLR and mirrorless cameras can be mounted on a gimbal.
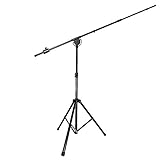
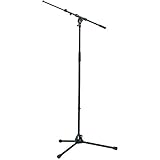
TRIPOD
Handheld shooting is not easy; that is why I always recommend you use a tripod or a monopod for your recordings. That too, if your camera or your lens lacks an in-built IS(Image stabilization), then having a tripod is a must.
Gimbal vs. Tripod, which is better? Both give smooth videos; however, the difference lies in their use case. You must have seen vloggers using a selfie stick-like thing for taking videos; those are called gimbals. They are helpful for people who want a portable stabilization system in their hands.
However, suppose you are a travel, wildlife, or wedding photographer wanting to position your camera in a place and then take shots. In that case, a tripod is useful. You won't believe, these days there are tripods specifically designed for hunting & tripods for spotting scope also.
With that said, tripods come in different sizes. They can be lightweight ones useful for travel vloggers or slightly heavy great for studio-related purposes. Only then you need to make sure is to use the perfect tripod mount that's compatible with the camera you're using.
The list given below consists of the most recommended tripods for vloggers. Check the list and purchase one if you find the product useful.


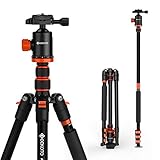
Using a tripod, you can get tack-sharp pictures/videos in low-lights. Also, having a tripod is recommended for taking perfect time-lapse shots, close-ups, and long exposure shots.
Though there is a huge variety of tripods in the budget range, make sure you purchase a quality one. Low-budget tripods are usually made of aluminum or magnesium alloy, whereas slightly higher-priced tripods use carbon fiber in their construction.
I would suggest purchasing a tripod made of carbon fiber as it is lightweight and also durable. Secondly, the tripod’s legs need to be sturdy to not slip off while shooting.
MONOPODS
The purpose behind using a tripod and a monopod is the same. The difference only lies in the number of legs they have.
A monopod, as the name tells you, has a single leg; however, a tripod is a stabilization system with 3 legs. Both tripods and monopods allow you to adjust the height, and both allow easy removal of the camera from the plates.
If you have an area constraint, say you're in a crowd and want to take videos amidst that crowd. Then it's practically not possible to mount your camera on a tripod as it will consume more space. In that case, a monopod will serve better.
That's the only difference between a tripod and a monopod. The rest of the features remain the same for both.

CAMERA STORAGE ACCESSORIES
DRY CABINET
Have you heard of the term "lens fungus"? You know how hard it is to get off lens fungal attacks. And the primary reason for such problems is "HUMIDITY. "
Thus, to protect your camera lens, camera, and other camera gear from excessive humidity, have a dry box/dry cabinet installed at your home.
Basically, dry cabinets, also called dry boxes are storage cabinets that contain shelves/racks to place your cameras and lenses. Not only humidity but dry cabinets also protect your expensive camera equipment from dust, corrosion, and rust.
If you are looking for home storage ideas to store cameras, lenses, gimbals, and more, you should definitely consider purchasing a dry box.
And when it comes to a dry cabinet's holding capacity, you have a lot to choose from. Dry cabinets come in different sizes induced with different technologies. From 30L dry cabinets, you have options to go till 100L. You just need to choose the one according to the number of equipment you will need to store in the storage box.

And the best part about using a dry box is that it doesn't need huge power to operate. Yes, a supply of 8W is enough for a dry cabinet to function. With that said, take a look at my best choice for a dry cabinet.
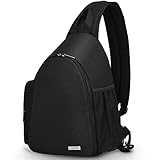
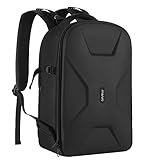
CAMERA BAGS
If you will often be traveling, then it is practically not possible to carry a heavy camera suitcase or a dry cabinet with you. In that case, you can invest in a camera bag. When I say camera bag, it includes sling-type bags, backpacks, or a shoulder bag.
If you want to purchase a camera bag for different purposes, check out these articles:
- Best Travel camera backpacks
- Best Camera Bags For Women Use
- Best leather camera backpacks
- Best waterproof camera bags
- Best rolling camera bags with wheels
Purchasing a camera bag is not that difficult; you just need to consider two factors: The number of camera gear you want the camera bag to hold and the durability of the material.
If you have a camera bag in your hand but looking for a compartment type, don't spend your money on a new camera bag. I have got a list of the best camera inserts for backpacks. You can use them.

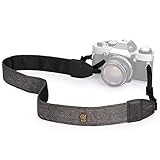
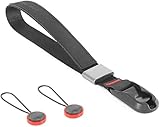
CAMERA STRAP
I'm not compelling you to purchase a camera strap because your camera itself will have one. But one thing I can assure you is that you will definitely have a comfortable shooting period if you have any of the camera straps mentioned here.
Camera straps come in two forms: A cross-sling strap and a wrist strap. Cross-sling straps are useful for wedding and sports photographers because you can move the camera around your body easily and shoot from varied angles.
Wrist or hand straps are useful for travel photographers because they are designed for lightweight camera bodies.
By having a hand strap, you can at least reduce neck strain, so what about purchasing one?!

PROTECTIVE WRAP
If you feel directly placing your expensive camera gears in a sling bag or a backpack is less protective, you can use a protective wrap.
As the name suggests, this is a plain wrapping material to tightly enclose your cameras and lenses so that they can be carefully placed inside your camera bags or dry cabinets.
This is the best storage idea for those looking for a travel-friendly and less bulky storage solution.
If your backpack doesn't have proper cushioning or slots, then I highly recommend you store your cameras and lenses in a protective wrap before you directly place them in your camera backpack. By doing so, you can protect your delicate and expensive camera gears from scratches, bumps, and accidental fall-offs.

FILMING AUDIO ACCESSORIES
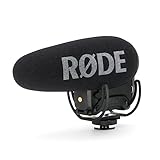
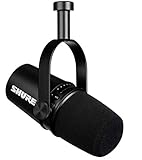
MICROPHONE
Do you do podcasting or Youtube vlogs? Be it any professional video work you do; you need to have a good-quality microphone to get the best sound output.
Remember, the audience will be interested in watching your videos if the audio is clear without any unwanted pickups.
If background noise is not a matter to you, then a dynamic microphone (doesn't require power) is best for you. However, if you're in a studio set up and even the slightest noise in your background matters to you, then a condenser mic (requires power to operate) is best.
Based on the pickup pattern, there is a wide variety of microphones in the market. This includes uni-directional, bi-directional, and Omnidirectional cardioid microphones. Many find it difficult to purchase a proper mic attachment for an action camera, but you can find one easily.

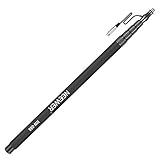
BOOM POLE
What is a boom pole, and what is its purpose? To understand that see the image given at the side. Now I think you would have got an idea about what a boom pole is.
So, the boom pole is nothing but a stick-like mechanism that has a screw mount on its end to mount your microphone.
Using a compact and lightweight boom pole, you can move your mic in all directions and record the speaker's sound with clarity.
They are used for interviews and recording vocals where the camera operator will be holding this piece of equipment.
MICROPHONE BOOM ARM
If you are a self vlogger or do self podcasting, then why not make your shoots super fun and easy using a microphone stand. Using a mic stand/ mic boom arm, you can clamp your mic onto the stand and adjust its position according to your requirements.
By having your mic positioned in this way, you get clear sounds and speak/sing sitting in a comfortable posture even for long hours. Most mic arms are rotatable to 360 degrees, which is a huge bonus for podcasters and vloggers.

AUDIO MIXERS
Is music production your area of interest, and have you thought of investing in an audio mixer for streaming? Trust me; you can record and live stream audio if you have a proper mixing console in your hand.
So, what is an audio mixer? In the image given at the side, you will notice that an audio mixing desk consists of various input channels.
This electronic device will capture sounds coming from different input channels, combine and process them to deliver fewer outputs.
Be it any gluts or any distortion in the incoming sound; you can easily adjust the levels and add effects to nullify the negative effects.
They are widely used in concerts, DJs, broadcast stations, recording studios, and TV channels.

STUDIO MONITORS
Photographing is an enjoyable task, but for most people editing the pictures, videos, or adding audio effects in post-processing seems very hectic. Probably you are not using the right studio monitor.


LENS ACCESSORIES
LENS FILTERS
What is a lens filter, and why is it important in photography? Is that your question? I’ll tell you the answer. Lens filters are thin glass elements that you place in front of a lens, and their purpose is to reduce lens flare/glare and unwanted reflections so that your pictures look rich in colors and clear.
With this said, lens flare editors can do the same job a physical filter can do, but to get better quality pictures and videos even while shooting, it is better to use a lens filter. It doesn’t cost much, so investing in a lens filter will not take much of your money. It also reduces your post-processing time.
There are three major types of lens filters available in the market: Polarizing, UV, and ND (Neutral Density) filters.
Polarizing filter:
If you love taking landscapes, then try using a polarizing filter. You will get a more saturated color, with the blue skies looking deep. Basically, a polarizing filter works like sunglasses to reduce unwanted glaring/reflections, thereby adding depth to the images/videos.
Using a polarizing filter on a lens is not a big bang theory. You just have to mount the filter on your lens and give a slight rotation to position it.
Depending on how light waves enter a filter, a polarizer is divided into two types. This includes a Circular (with a second quarter-wave to repolarize light) and a Linear polarizer (with a single layer to repolarize light).
UV Filter:
The purpose behind using a UV filter is to prevent UV light rays from entering the lens. Because UV rays are not only harmful to human skin but also deters a lens’ performance.
Yes, when UV rays are not filtered, it might cause haze and fog on a lens’s surface, which we don’t want.
Apart from the basic purpose of preventing UV rays, a UV filter also protects a lens’ front element from dust, scratches so you can use it in a damp or dust-prone environment.
ND filter (Neutral Density Filter):
Coming to the most widely used lens filter - ND filter. If you are taking long-exposure shots, the probability of losing the image sharpness is high because unwanted light will be entering the lens in long-exposure photography.
In that case, having an ND filter mounted onto a lens is useful. This dark-colored glass will help you get a shallow depth of field when photographing in bright light and reduce the intensity of light in long exposures or when using studio flashes.
But don’t worry; the color reproduction of the images will remain undisturbed when using an ND filter.


LENS HOOD
Lens hood is the additional attachment in front of a lens that will help reduce lens flare, thereby indirectly improving the color contrast in the pictures.
A lens hood also protects a lens from knocks or any kind of physical damage. High-end cameras include a detachable lens hood; however, you might have to purchase one separately if you own a low-budget cam.
The most common shapes a lens hood is manufactured are these: Three-petal shaped lens hood, cylindrical lens hood, conical and four-petal (different sized petals) lens hood.


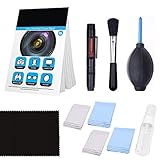
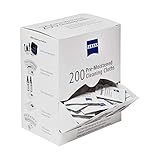
LENS CLEANING KIT
I recommend you get a lens cleaning kit when you purchase a brand new lens or a camera. Because only if you properly maintain the lens will it last longer.
The list of the camera lens cleaning kit mentioned below consists of a lens blower, a lens brush, a cleaner solution, and a few lens cleaning swabs.
It is preferable to use lens cleaning wipes to clean a lens surface. Because they will help clean a lens without causing any scratches to the lens surface. The Zeiss cleaning wipes mentioned below are one of the most purchased lens cleaning swabs used by photographers. Try using one!

CAMERA LIGHT ACCESSORIES
Camera lights:
If you will be shooting indoors or in outdoor low-lighting conditions, it is recommended to use an artificial light setup to get brighter shots and videos. With that said, let me tell you the types of artificial camera lights you can go for.
FLASHGUN
If you have just begun your photography career, it is an excellent choice to invest in a flashgun. A flashgun/ a Speedlight is a small flash mechanism that you can attach to your camera. The flash quality is pretty decent and will satisfy your casual indoor or outdoor low-light shots.
You have a wide-variety of flashguns for entry-level cameras like Nikon D750, Canon EOS 200D and a lot more. Check the links below!
Also check the articles below, for more buying options:


RING LIGHTS
If you want to take pro-quality portrait shots for vlogs, interviews, or post in your insta, then ring lights are helpful.
People also opt for a ring light for taking music videos as it gives continuous, powerful lighting.Some ring-light models also come with in-built flash modes and speed-sync modes, which is a bonus.
Most ring lights allow color adjustment to fit the environment you are shooting, which is the main feature that attracts customers.
Below I have listed the 3 best ring-lights you can use for your video/still photography shoots.


SOFTBOX
This is for professional videographers and studio photographers.
A softbox is basically a lighting adjustment tool or a light modifier that will allow you to manage the lighting in a studio. The construction looks like this: A stand containing a translucent cloth fitted with a powerful light source on the top. Softboxes come in different shapes like rectangle, octagon, square, or linear form.
You must have seen product influencers, AD filmmakers using this setup for taking commercial video shots.
The translucent cloth used in a softbox is black on the outside and white/silver on the inside. Now I’ll tell you how a softbox works. Firstly when the softbox is connected to a power supply, the Speedlight turns on.
This light is now evenly distributed throughout the inner frame giving you an evenly diffused light. The outer black part simultaneously will stop light from reflecting back to the studio. This is how a softbox functions.
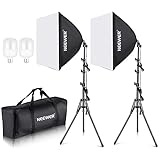
Overall, a softbox for speedlight will allow you to maintain a balance between light and shadow in the shot. In studios, softboxes are mounted on tripods so that you can modify the light falling on the subject as per your choice. After you learn how to use a softbox, you will know how useful it is to get rid of unpleasant shadows and even out the light throughout the frame.
Below I have listed some softbox lighting kits. You can use them with a green or any plain backdrop and get amazing studio-like lighting. Also, check my list of the best lights for a green screen backdrop, where you will have multiple options to choose one.
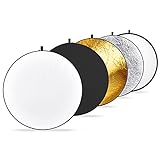
REFLECTORS
This is another affordable way to control the lighting in your shots and videos. Reflectors are light modifiers that will bounce back the light to the subject.
It is a great tool for taking flattering portrait shots because it allows you to adjust the subject’s color, tone and also tilt the light direction as per your choice.


LIGHT TENTS/ LIGHT BOX
Product influencers, don’t forget to check out this product. If you miss it, you are losing something big.
Well, what is a light tent? A light tent is a collapsible structure with a diffuser panel on one side, and a reflector panel on the other side tied together at the top.
These translucent sides of a lightbox diffuse the incoming light coming from multiple sources giving a uniform shadow-less lighting against a flat background. This is what makes the pictures of the products stand out and look rich in picture quality.
Below I have given links to purchase a light tent separately and as a kit. The advantage of purchasing a light tent kit is that you can get one or more light tents, light bulbs, light stands, a tripod, and fabric backdrops in a single package.
OTHER CAMERA GEARS
HARD DRIVE
It is highly recommended you own a portable hard drive because you cannot store all images and videos on your PC and carry it wherever you go. Also, for people who do a lot of video and audio editing, I prefer you use a hard drive to have a backup of files.


MEMORY CARD
Memory cards are a must for on-the-go photographers because you don’t know when your camera will run out of storage. Most digital cameras today support dual SD cards, which is an added advantage.
But for your information, apart from SD cards, there are multiple types like micro SD, CFast cards, flash memory cards, and a lot more. But you have to choose a memory card that is supported by your camera, that’s important!
What to look for while purchasing a memory card for your camera?
Size: An SD card of at least 16 GB size is preferred for photographers because you will constantly be shooting pictures and videos, and you always need large external storage.
Read and Write speeds: Choose a memory card with fast read and write speeds. Only then the file transfer will be efficient. Not only that, an SD card with good processing speed will improve the burst mode on your camera.
Read more:
Recommended SD CARDS FOR MAVIC 2 PRO

![[Older Version] SanDisk 64GB Extreme PRO SDXC UHS-I Card - C10, U3, V30, 4K...](https://m.media-amazon.com/images/I/51x1jeppPJL._SL160_.jpg)

MEMORY CARD READER
A memory card reader, as the name suggests, is used to read the information stored in a memory card.
The advantage of using a memory card reader is that the reading speed is very fast. You can do the file transfer using a USB cable or using the camera apps; however, they are not reliable in all situations. That is why it is always recommended to have a card reader in your hand.
On that note, memory card readers come in different card formats, and SD format is the most common. But before purchasing a memory card or a memory card reader, first, note what card format your camera supports.
Here is a list of the best card readers for these card formats: Standard SD cards, microSD cards.


HDMI CABLES
Recent digital camera models, including DSLRs, mirrorless, cinema, or compact video cameras, come with an HDMI port facility. HDMI port will allow transferring of images and videos from your digital camera to a PC, tablet, or TV.
The three major types of HDMI ports include Type-A, Type-C, and Type-D.
![uni USB C to HDMI Cable, [4K, High-Speed] USB Type C to HDMI Cable for Home...](https://m.media-amazon.com/images/I/41uOPeybW-L._SL160_.jpg)


SCANNING AND PRINTING DEVICE
DIGITAL VIDEO CONVERTER
If you want to revive your old memories stored in your old film reels, then what about purchasing an analog to digital video converter? In this digital world, be it an 8mm, super 8, or 16mm analog film reel, you have technologies to convert them to a digital format.
Some prefer professional digitization services or online tools for getting this conversion done. However, having a VHS to DVD converter at home is more easy and cost-effective.
How does digital video converter equipment work? Basically, you will load your old tapes onto one side of the digital video converter. If you have smaller films like 8mm, just take the film and load it in the film scanner’s insertion slot.
Now the converter will scan the analog information and transfer it into a digital format. You can either store the digitized file in the scanner’s in-built memory or even transfer it to an SD card, hard disk to view them later.
Some models also provide TV cables so that you can directly stream the videos on your televisions. Great right!
How to choose the best film scanner? Well, remember this: Different VHS to digital converters scans the files at different speeds. Some high-expensive models can scan the analog files at the rate of 30 fps, which is indeed fast.
Also, the resolution of the converters will vary according to the price.
The main thing you have to remember while making a purchase is to check if your old film reel is compatible with the converter. E.g., If you want to transfer an 8mm film to digital, you have to go for an 8mm film scanner instead of a 16mm digital video converter. I hope you’re getting my point?
Check out the links below if you wish to purchase an 8mm film to digital video converter.
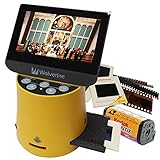


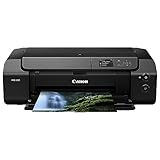
PHOTO PRINTER
If you own your own photo studio, then having a good-quality photo printer is crucial. While choosing a photo printer, choose one from a reliable brand like CANON or EPSON; they have a huge collection of photo printers.
What to look for in a photo printer? Size of the photos you want to print and the ink quality. There are other factors like budget, brand, etc. however, these two factors need to be looked upon for sure.
Below I have given links to purchase the best 4*6 photo printer, A4 printer, and A3 photo printer. Have a look!


FILMING ACCESSORIES
JIB CRANE
Have you seen professional cameramen holding this equipment in their video shoots? It is nothing but a camera crane or a JIB arm.
Using this equipment, you can mount your camera at its end and take shots and videos from varied angles. Crane Jibs can be rotated up to 360 degrees and allow both horizontal and vertical movements.
It is excellent for taking panoramic shots, commercial AD shoots, and movie making.
Using a jib or a video camera crane, you get complete control over your shots and get shake-free top-down videos and aerial shots.
Isn’t it preferable to mount a camera or a camera crane and take videos from different heights rather than just mounting a cam onto a tripod and shoot with distance constraints?

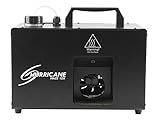
FOG MACHINE/SMOKE MACHINE
Suppose you wish to get a filmy feel at your home parties or any special event think of investing in a fog machine. You can create a foggy background in seconds by using a fog machine.
The difference between a normal fog machine and a low-lying fog machine is that the former creates a thick white cloud that spreads throughout the room. However, in a low lying fog machine, as the name suggests, the thick cloud/fog will remain on the ground level itself.
If you ask me how long the fog will last in both cases, I will say roughly around 120 minutes. However, different fog machines have different duration, so it depends on the product you purchase.
Another type of smoke machine is a haze machine. Here instead of a thick cloud, you will get a thin smoky effect when used alongside a beam light or a laser. Normally haze machines are useful for stage shows and concerts.
If you have any upcoming events and want to add a punch to the party, try using a haze or a fog machine. You’ll love it.


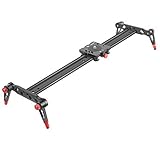
CAMERA SLIDER
A motorized camera slider has a set of tracks/rails that allow you to take motion pictures and videos. A camera slider has a “movable carriage” on which you will mount your camera. You can also mount your camera on a tripod and then place it on this movable carriage. It’s your choice.
Camera sliders are mostly used for recording music videos, filmmaking and commercial Ad shoots.


DRONE
Camera drones are common these days. They were mainly manufactured for military operations and surveillance. After that videographers found this equipment useful for professional moviemaking, shooting live sports events and other commercial purposes.
Today drones have become so popular that people have made it a mandatory equipment even in weddings and even small functions. Using a camera drone adds so much fun and if you can’t afford on an expensive jib crane then purchasing a camera drone is a good choice.
With that said, expensive camera drones like DJI Mavic 2 Pro - Drone will cost around 2000$ as it has advanced features. If you're new to using drones and don't know how to reset drones, then better learn it properly because only if you know how to use it, you can get the best out of the drone.
NOTE: Mavic Pro vs. Mavic Air, which is better? To know that, you have to read my article on the similarities and differences between a Mavic Pro and Mavic Air drone.
V MOUNT BATTERY
You may have the latest camera gadget in your hand, but you can’t predict when its battery power will get drained.
To avoid such mishaps, always carry some extra batteries in your hand and regularly charge your cameras.
Even having a battery grip (promote products) in your hand is a good choice. A battery grip is nothing but a camera accessory that will allow you to equip two or more batteries to the camera.
Having a battery grip attached to your camera will also provide you with convenient handheld shootings as it will give you a good holding grip.

GREEN SCREEN AND BLUE SCREEN
Before getting to know the use of a green screen or a blue screen in filmmaking, let me ask you this. Have you heard about Chroma keying? It is a filming technique where actors and lead roles enact before a flat single-colored screen. Using this technique, you can change the virtual background using software and replace parts of the footage with the required scenes according to your preference.
To make it simpler, have you seen the making video of a Harry Potter series or a titanic? If yes, you must have noticed the graphic sequences of the actors flying or a deep-sea cut shot with a green screen background.
The reason for opting for a green or a blue screen is these colors don’t match human skin tone or natural hair color. So, it becomes easy to remove parts of the virtual background easily.
The blue screen works best when you’re using any green-colored property in your shoots. Using a green screen or a blue screen depends on your choice and the type of shoot you do. In my article Blue screen vs. a green screen, which is better? I have mentioned the pros and cons of each in detail. Do check out the article for more information!
On this note, I also want to mention this. If you wish to save some money in purchasing lights, stands, and a green screen, you can buy them in a kit form.


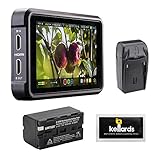
EXTERNAL CAMERA SCREEN
If you wish to view your video recordings on a slightly big screen immediately after taking your shots, then an external camera screen is there to help you.
Have a look at the options below to purchase one.


CONCLUSION
You have reached the end of this article. Did you find this post useful and interesting? If so, do let me know your feedback in the comments section below.
I have included almost 34 products that will help you in your photography career in some way. So take time to think about which camera equipment you're in need of and make the right purchase. Good day!