
How To Connect Camera On Mac (Definitive Guide)
INTRODUCTION
A ton of people avoids getting the Mac simply because of the perceived image that everything on a Mac is complicated. Well, to answer to that is yes and no. With that said, connecting your camera to a Mac is of the things that fall into the "no" category now, meaning its not complicated.

In this article, I will tell you guys how to connect camera on Mac. It is pretty easy, so don't sweat it. I will structure this article as a step by step guide for the sake of convenience. Follow along with the steps and you will be able to hook up your camera to your Mac in no time. Without further adieu, let us begin.
how to connect camera on Mac
Just like you would in a PC, you need to connect your camera to the Mac using a cable. There are 2 kinds of cables were frequently used to connect a camera to PC or Mac in this case.
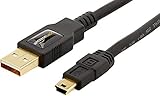

MICRO USB 3.0 CABLE
One side, the "special part" or "different part" of the cable will go into your camera while the classic USB part will go into the USB port on your Mac. Thankfully, manufacturers include the compatible cable in the box when you purchase the camera, so you do not have to run around the store to get it.
If you have lost yours, well, see which cable your camera is compatible with and get it. Also, check your camera's user guide and see if entering the Menu system is necessary to set-up the USB mode with Mac. Also, make sure that your camera is off before you plug it in.
When you have cables connected in the right places, you need to turn on your camera. If everything is done correctly, meaning the wire is working and you have set up your camera to operate on your OS (if necessary), your Mac should automatically detect your camera and open up iPhoto.
Now, provided if it did not, do not worry, click on the "Go" (pull-down) menu and find "Applications" and click on that. Now, locate the iPhoto icon and double click on that. It will now show you a preview of all the photos inside your camera's storage.
Here, you can also give your photos a description and name, which you may or may not want to do. Never hurts to have the option though.
Now, at this point, your camera is connected to your Mac. With that said, I am sure that was not the only aim. However, I am going to take a guess and assume that you want to import the images in your camera to your Mac.
In order to do so, highlight all the photos you wish to import from your camera and then click "Import selected". Conveniently, there is an "Import all" option as well if you want to, well, obviously enough, import all the pictures.
Once all the photos have been downloaded onto your Mac, iPhoto will ask if you wish to delete the original photos from your camera. You can do that if you want too. I am a bit paranoid when it comes to technology, so I would double-check before doing so. With that said, it does save you from the hassle of selecting pictures later and deleting them.
This one is a more fire-worthy pun. After you have successfully transferred your photos onto your Mac. It is time to disconnect everything safely. You can always yank things off which, I am assuming, you will, but I would recommend you do not do that. Instead, turn off your camera and then remove the cables.

It is safer this way because there is electricity running through the cable and though the chances of it hurting you or your gadgets are almost none, hey, remember what I said? I am a bit paranoid when it comes to technology.
alternate method
Before I let you go, here is an alternate method that can be used in case your battery or cable is not working. So, when you connect your camera to your Mac, it is going to need to use the battery to turn on. The battery will drain while it is turned on if you do not have it on charging of course.
If you want a workaround this problem, what you can do is get yourself a USB Card Reader. They are widely available so you will not have any trouble getting your hands on one. A Card Reader is a device that can read the data of your cards while having the ability to hook up with your PC or Mac so whatever data is on the card, all of it can be accessed through the Mac.
You can get yourself a card reader that specializes in reading the card your camera uses or you can simply get one of those card readers that have multiple ports on them, they are fairly cheap.
CONCLUSION
And that is it, folks! Pretty simple, wasn't it? For the most part, Macs are just like PCs that most people are familiar with. Sure, they do things differently, but that is simply because they work on different Operating Systems. Anyways, I am not here to start and take part in any debate, my job was letting you know how to connect a camera to a Mac and I just did that. So, thank you for reading!